How Do I Manually Read Values From Dht11
The DHT11 humidity and temperature sensor makes it actually piece of cake to add humidity and temperature information to your DIY electronics projects. It's perfect for remote weather condition stations, dwelling house environmental command systems, and farm or garden monitoring systems.

In this tutorial, I'll first go into a little background about humidity, and then I'll explain how the DHT11 measures humidity. Later on that, I'll evidence you how to connect the DHT11 to an Arduino and give you some example lawmaking and then you tin apply the DHT11 in your own projects.
BONUS: I made a quick start guide for this tutorial that you lot tin can download and get back to subsequently if yous can't gear up this upwardly right at present. It covers all of the steps, diagrams, and lawmaking yous need to become started.
Here are the ranges and accurateness of the DHT11:
- Humidity Range: 20-90% RH
- Humidity Accuracy: ±five% RH
- Temperature Range: 0-50 °C
- Temperature Accuracy: ±2% °C
- Operating Voltage: 3V to 5.5V
The DHT11 Datasheet:
![]() DHT11 Datasheet
DHT11 Datasheet
What is Relative Humidity?
The DHT11 measures relative humidity. Relative humidity is the amount of water vapor in air vs. the saturation point of h2o vapor in air. At the saturation point, h2o vapor starts to condense and accumulate on surfaces forming dew.
The saturation point changes with air temperature. Cold air can hold less water vapor before information technology becomes saturated, and hot air tin can hold more water vapor before it becomes saturated.
The formula to calculate relative humidity is:

Relative humidity is expressed as a per centum. At 100% RH, condensation occurs, and at 0% RH, the air is completely dry out.
How the DHT11 Measures Humidity and Temperature
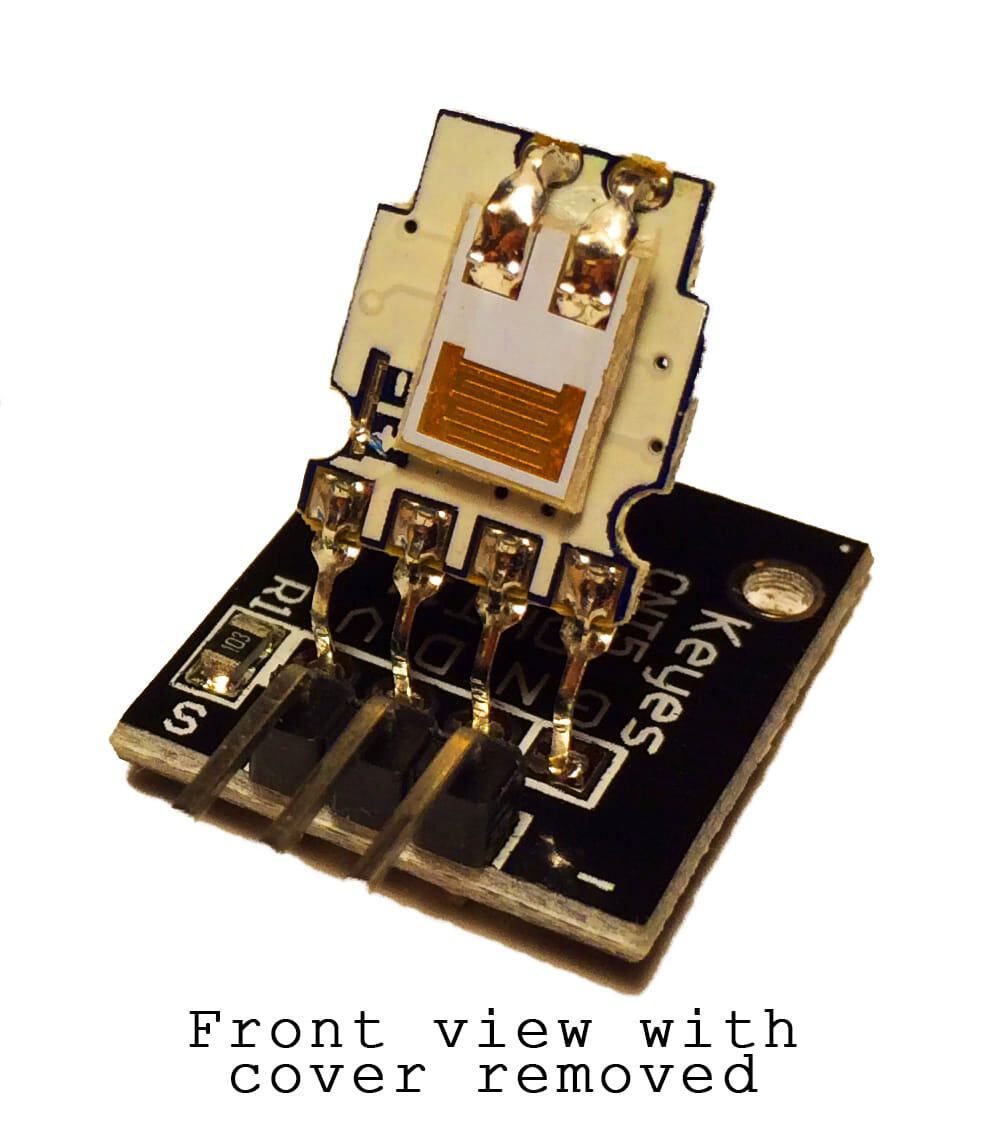
The DHT11 detects water vapor by measuring the electrical resistance betwixt two electrodes. The humidity sensing component is a moisture holding substrate with electrodes applied to the surface. When water vapor is absorbed by the substrate, ions are released by the substrate which increases the conductivity between the electrodes. The change in resistance between the two electrodes is proportional to the relative humidity. Higher relative humidity decreases the resistance between the electrodes, while lower relative humidity increases the resistance betwixt the electrodes.

The DHT11 measures temperature with a surface mounted NTC temperature sensor (thermistor) built into the unit. To learn more almost how thermistors work and how to use them on the Arduino, check out our Arduino Thermistor Temperature Sensor Tutorial.
With the plastic housing removed, yous can see the electrodes practical to the substrate:
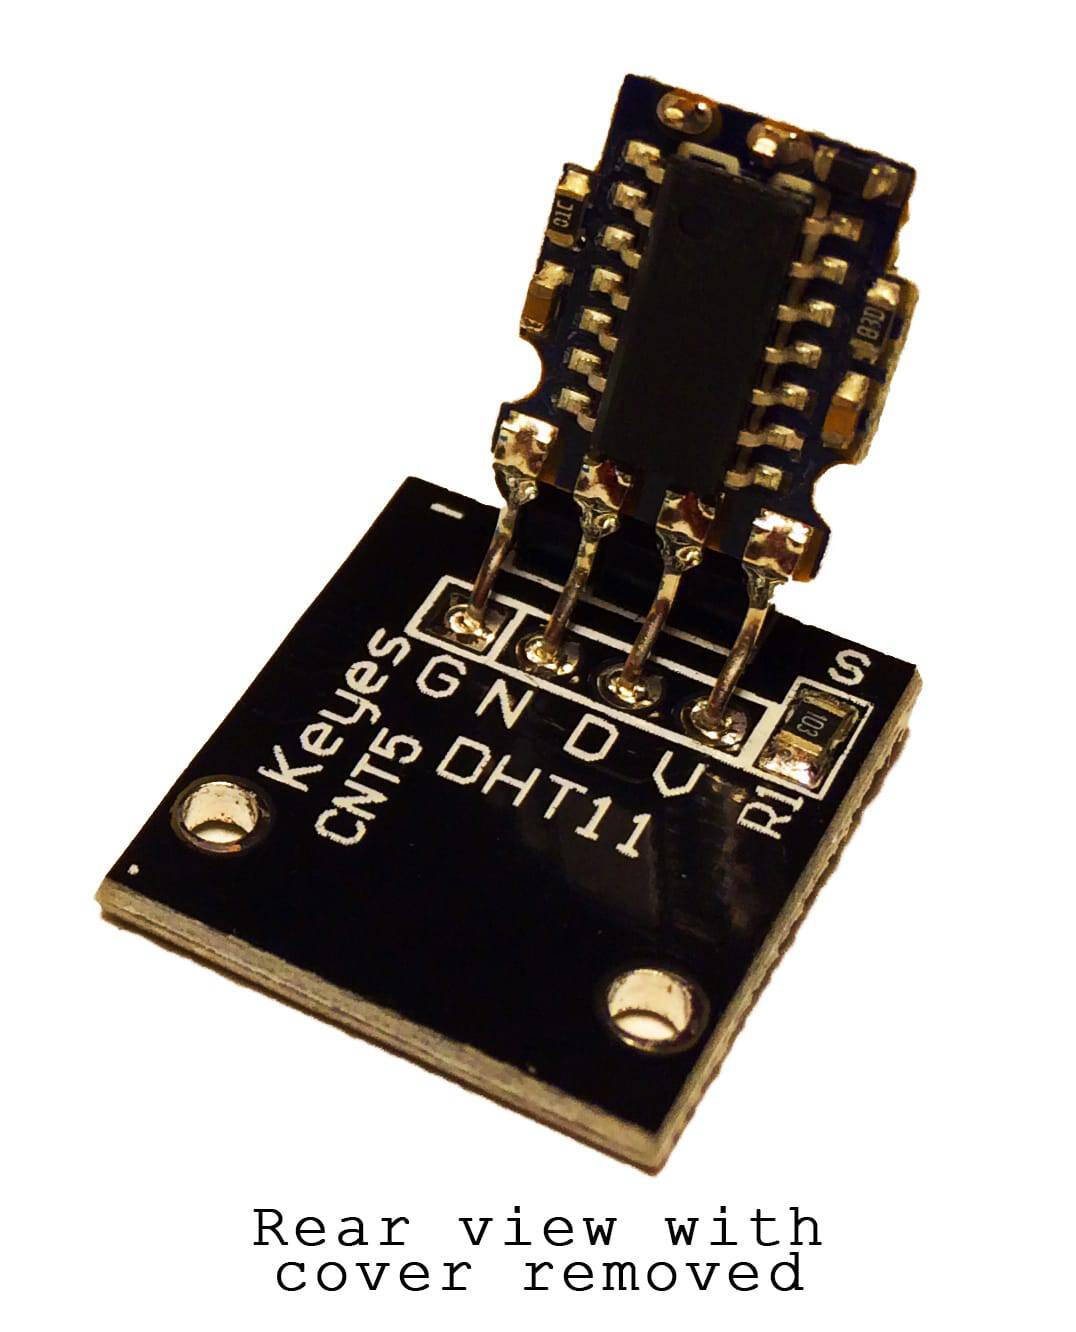
An IC mounted on the back of the unit converts the resistance measurement to relative humidity. It as well stores the calibration coefficients, and controls the information signal transmission between the DHT11 and the Arduino:
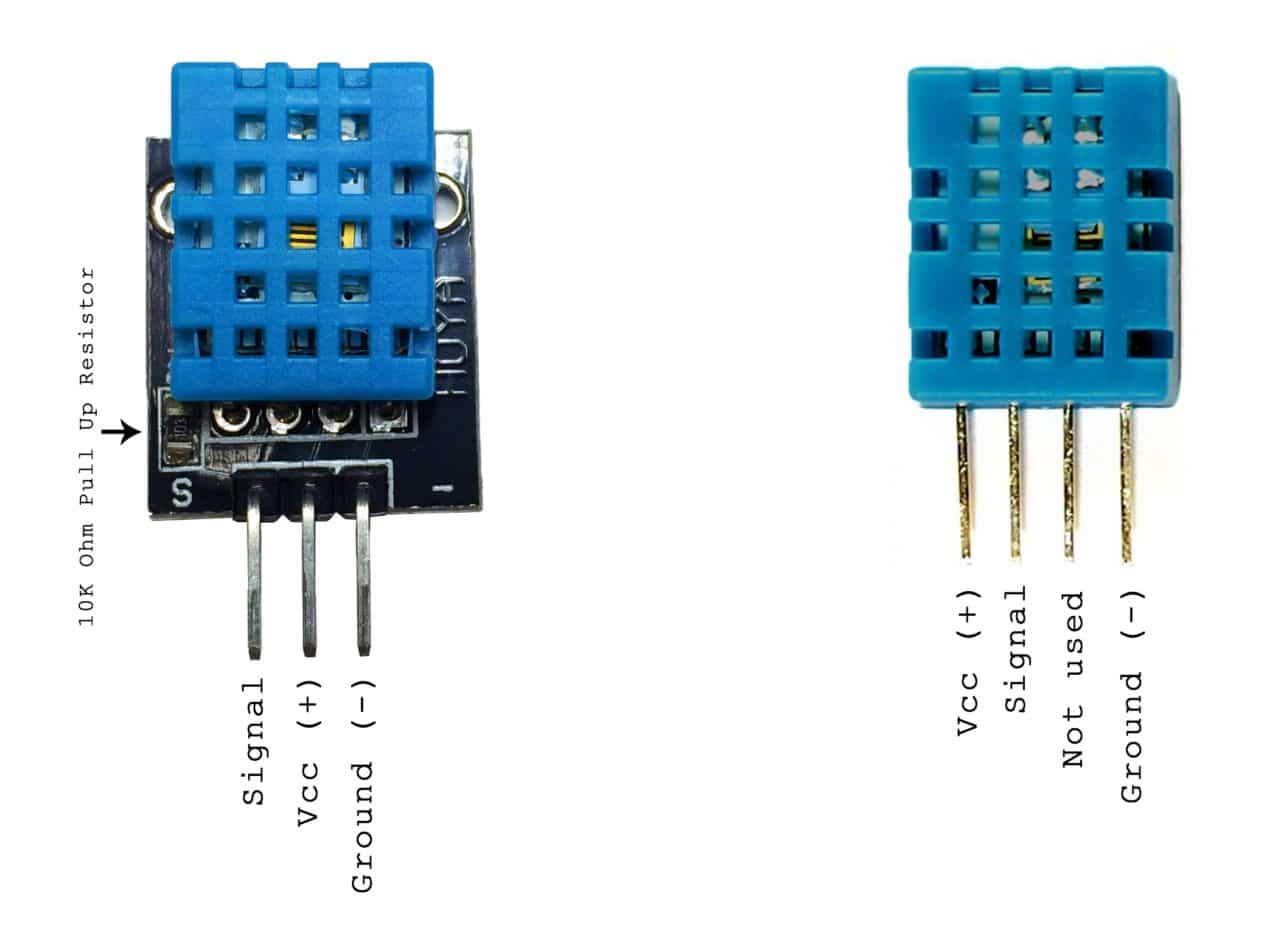
The DHT11 uses but one signal wire to transmit data to the Arduino. Ability comes from separate 5V and ground wires. A 10K Ohm pull-up resistor is needed between the betoken line and 5V line to make sure the point level stays loftier by default (come across the datasheet for more info).
In that location are ii different versions of the DHT11 you might come up across. 1 type has iv pins, and the other type has iii pins and is mounted to a small PCB. The PCB mounted version is dainty because it includes a surface mounted 10K Ohm pull upwards resistor for the signal line. Here are the pin outs for both versions:
How to Set up the DHT11 on an Arduino
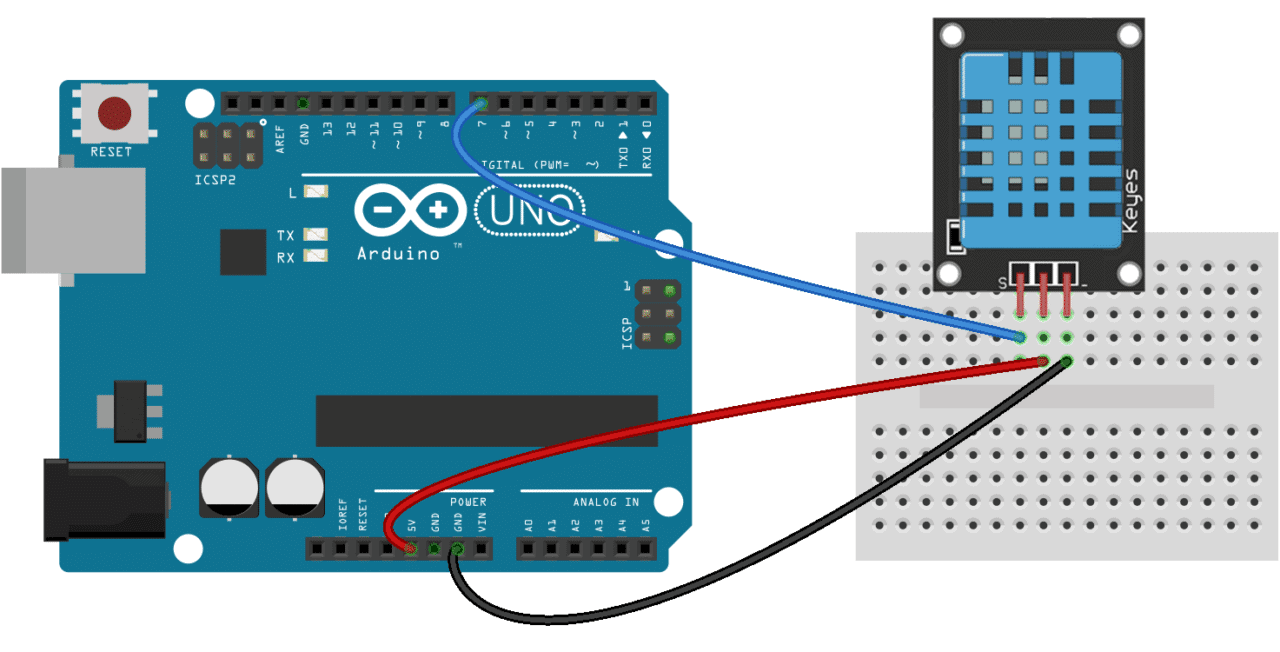
Wiring the DHT11 to the Arduino is really easy, but the connections are different depending on which type you have.
Connecting a Three Pin DHT11:
Connecting a Four Pin DHT11:
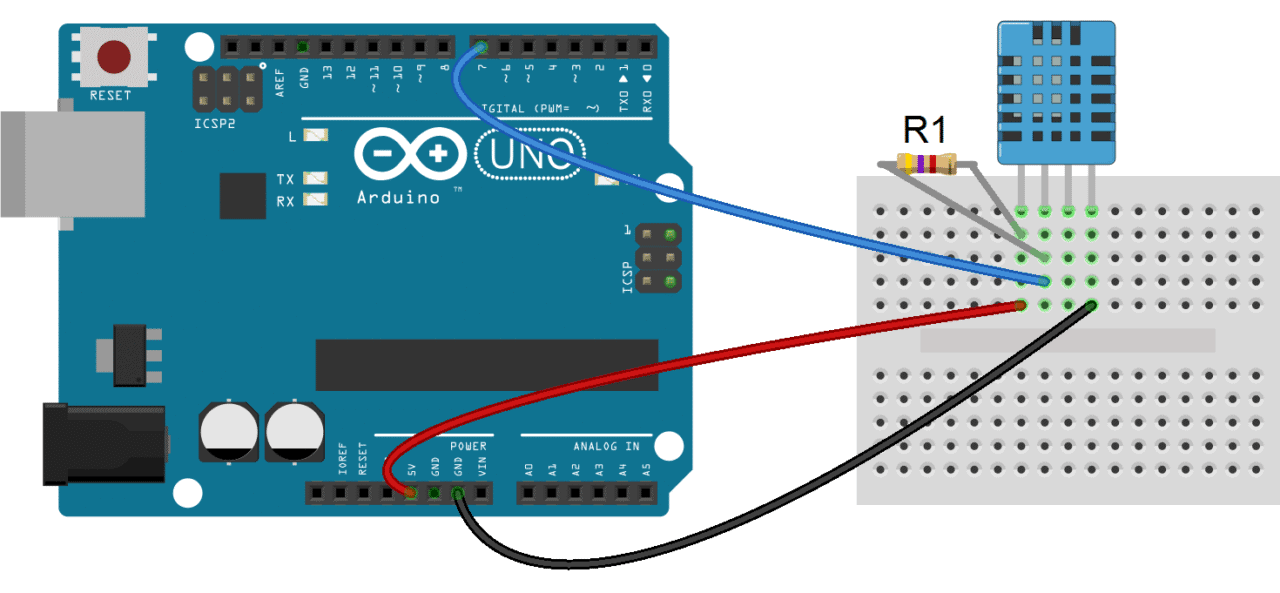
- R1: 10K Ohm pull up resistor
Display Humidity and Temperature on the Series Monitor
Before you can use the DHT11 on the Arduino, y'all'll need to install the DHTLib library. Information technology has all the functions needed to go the humidity and temperature readings from the sensor. It's easy to install, just download the DHTLib.nothing file beneath and open upward the Arduino IDE. And then go to Sketch>Include Library>Add together .Null Library and select the DHTLib.zip file.
![]() DHTLib
DHTLib
Subsequently it'due south installed, upload this example programme to the Arduino and open up the serial monitor:
#include <dht.h> dht DHT; #ascertain DHT11_PIN 7 void setup(){ Serial.begin(9600); } void loop(){ int chk = DHT.read11(DHT11_PIN); Serial.print("Temperature = "); Serial.println(DHT.temperature); Serial.print("Humidity = "); Serial.println(DHT.humidity); filibuster(yard); } You should see the humidity and temperature readings displayed at one second intervals.
If you lot don't want to use pin 7 for the information signal, you can change the pin number in line 5 where it says #define DHT11_PIN vii .
Display Humidity and Temperature on an LCD
A nice style to display the humidity and temperature readings is on a 16X2 LCD. To practise this, first follow our tutorial on How to Set an LCD Display on an Arduino, then upload this code to the Arduino:
#include <dht.h> #include <LiquidCrystal.h> LiquidCrystal lcd(12, 11, 5, 4, 3, two); dht DHT; #define DHT11_PIN vii void setup(){ lcd.begin(16, two); } void loop(){ int chk = DHT.read11(DHT11_PIN); lcd.setCursor(0,0); lcd.print("Temp: "); lcd.impress(DHT.temperature); lcd.print((char)223); lcd.print("C"); lcd.setCursor(0,ane); lcd.impress("Humidity: "); lcd.print(DHT.humidity); lcd.print("%"); delay(1000); } Using the Data in Other Programs
What if you don't desire to output the bodily humidity and temperature readings, but need them to calculate or command other things? The code below is the blank minimum needed to initialize the sensor. Y'all can add this to existing programs and use DHT.humidity and DHT.temperature as variables in any part.
#include <dht.h> dht DHT; #define DHT11_PIN 7 void setup(){ } void loop(){ int chk = DHT.read11(DHT11_PIN); delay(1000); } To meet an instance of using the DHT11 sensor outputs as variables in other functions, bank check out our commodity How to Set Up an Ultrasonic Range Finder on an Arduino, where nosotros use the DHT.humidity and DHT.temperature variables in a formula that improves the accuracy of an ultrasonic range finder.
You can watch how to set upwards the DHT11 and see how it works in this video:

If yous take any questions about how to set up the DHT11 humidity and temperature sensor on your Arduino, just get out a comment below and I volition endeavour to reply it… And if yous like our tutorials, please subscribe! Also, feel free to share this if you know anyone else that might find it helpful!
How Do I Manually Read Values From Dht11
Source: https://www.circuitbasics.com/how-to-set-up-the-dht11-humidity-sensor-on-an-arduino/
0 Response to "How Do I Manually Read Values From Dht11"
Post a Comment